
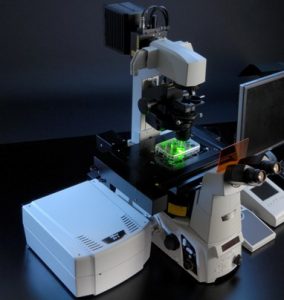
 Over the past couple of weeks, I have been facing my ultimate nemesis in my project, confocal microscopy. Confocal microscopy is a microscope that is able to measure fluorescence (light) from a fluorescent dye (light inducing). In the beginning, I thought it was going to be an easy task, but I was deeply mistaken. It has taken my a total of 5 weeks to master the microscope and to produce usable data for my project. The main hurdle that I encountered was learning to permeabilized my cells. This was a crucial step because it was going to yield accurate and useful data. If I didn’t master this, my whole project would come falling down.
According to my professor, cell permeabilization is a “dark art”. For the past 5 weeks, I have been perfecting the art of permeabilizing cells. Cell permeabilization is when we use a detergent solution to break down the cellular membrane that surrounds the cells. However, we don’t want to break down the entire membrane, because the cell components would literally spill out everywhere. To have usable cells, we have to correctly time the permeabilization so that the detergent solution leaves tiny holes throughout the membrane of the cell.

The tiny holes serve two purposes. Firstly, they allow excess dye to leave the cytosol or inner fluid of the cell. In my experiment, we were using Rhodamine 2-AM dye. This is a dye that is sensitive to calcium concentrations and will intensify when calcium is present. When staining the cell, the dye goes everywhere inside the cell. However we only want the dye inside the mitochondria because we want to measure the influx of calcium inside of the mitochondria. By creating tiny holes, we can force out the unnecessary dye that is surrounding the exterior of the mitochondria.
Secondly, the tiny holes allow the uptake of calcium to occur at a more reasonable rate. Without the permeabilization the calcium uptake would take minutes. With the permeabilization, the calcium uptake occurs in seconds, which allows us to produce many assays in one sitting.
Knowing when a cell is permeabilized was a huge challenge for me, because I had no idea what would a permeabilized cell looked like. On top of that, each cell line had different permeabilization time that was very inconsistent and would change every single time. With practice and much time, I was able to recognize and identify the signs of successful permeabilization.
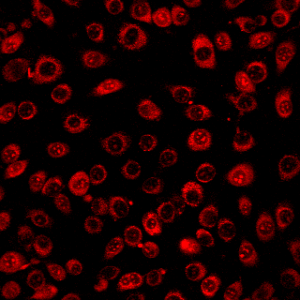 From what i achieved, a successful permeabilization will result in a grainy texture of the cell fluid that surrounds the nucleus. The grainy texture is in fact small bubbles that are a result of the break down of the cell membrane. Once we reach this stage, the permeabilization has just begun. To make sure that it is the correct amount permeabilization, the bubbles will increase in size and become even more grainy. Eventually, there comes a point where the bubbles are just the right size so that it will not destroy the membrane and it’s big enough to allow dye to flow out and calcium to flow in. This point is up to the discretion of the researcher. There is not a justified size to the bubbles, but after many practice rounds, there is a preferred size for each researcher every time.
Once I accomplished the skill of permeabilization, I was able to gather data. The way we gathered data was to start the laser recording, and during the recording, we would add a measured calcium solution directly onto the cells. After, we would watch what happened to the intensity of the dye. An increasing intensity would result in a higher influx of calcium. This is what we are looking for when we analyze the recording, because it means the cell is working and the mitochondria is doing its job.
For the most part, the results have been extremely good, but I am still collecting data at this time. It has taken many hours of hard work and dedication to reach this point, but both my mentor and I agree that from this point, things will be picking up at an increasingly fast pace. From this experience, I learned never to underestimate the easy things because sometimes there the ones that are standing in your way.
Image Resources:
Permeabilized cell:
https://www.thermofisher.com/us/en/home/life-science/cell-analysis/cell-analysis-learning-center/molecular-probes-school-of-fluorescence/imaging-basics/sample-considerations/preparing-fixed-cells-imaging.html
Confocal microscope:
https://itn-snal.net/2014/10/laser-scanning-confocal-microscopy-lscm/
Dyed cell:
Direct from lab data.