As the Fall 2020 semester drew to a close, several staff members of the Emory Center for Digital Scholarship (ECDS) met virtually to discuss their experiences of remote teaching and have offered a few best practices and tips in this blog post. While this is not an exhaustive list of suggestions, we hope these tips might help instructors in the process of creating/re-tooling syllabi, assessing teaching methods, and optimizing course content for remote teaching (both synchronous and asynchronous). We have also included links to some tools and helpful guides.
Contributors to this post include: Dr. Amy S. Li (Communications Specialist); Dr. Arya Basu (Visual Information Specialist); Bailey Betik (Digital Pedagogy Lead; instructor for TPC+R and EFOT); Ian Burr (Visual Design Specialist); Dr. Jesse P. Karlsberg (Senior Digital Scholarship Strategist); Dr. Joanna Mundy (Digital Projects Specialist); Megan Slemons (GIS Librarian); Michael Page (Geographer); Sarah Warren (Digital Scholarship Associate); and Wayne Morse (Co-Director of ECDS). Their fields of instruction included: English, Art History, Classics, 3D Visualization and Interactive Media Design, Environmental Sciences, Music, Intro and Advanced Geographical Information Systems (GIS), and Philosophy.
 Q: How can instructors get students to feel comfortable with talking on Zoom (and not only using the chat section)?

While keeping the chat function enabled can be important for students, especially when microphone or audio issues arise, some students need encouragement to make verbal comments (especially because their comments in the chat are usually relevant to class discussion).
Tips:
- Divide students into breakout rooms.
- This gets students started and gives them a chance to think through ideas in a smaller group.
- There are a couple ways to do this: some had success with pre-assigning roles within each small group (i.e. commentator, note-taker, reporter) before giving an activity. Others did not pre-assign roles, finding that merely giving a prompt and providing space and time to discuss in smaller groups already encouraged more verbal discussion after coming out of the breakout room.
- Breakout rooms help break the format of just staring at the screen the whole time.
- Give a prompt, set a timer (e.g., for 2-3 minutes), and allow students to write or brainstorm their answer before engaging in verbal group discussion.
- The anxiety of being wrong or speaking up in a large setting might be the reason students feel less comfortable responding verbally in class. Allowing people to process information and questions in a written manner first can be helpful for lessening this discomfort.
- Encourage students to come to (virtual) office hours early in the semester, or structure into the syllabus other small/individual co-meetings with the instructor.
- People who regularly showed up to office hours had more rapport with the instructor and/or other students and therefore felt more comfortable speaking in class too.
- Provides space for the instructor to provide early affirmation in a safe space.
- Don’t be afraid to use “awkward” silences productively.
- Instructors can ask students “Why” there is silence, or ask students to reiterate what is going on and ask why they might be confused or what questions they have.
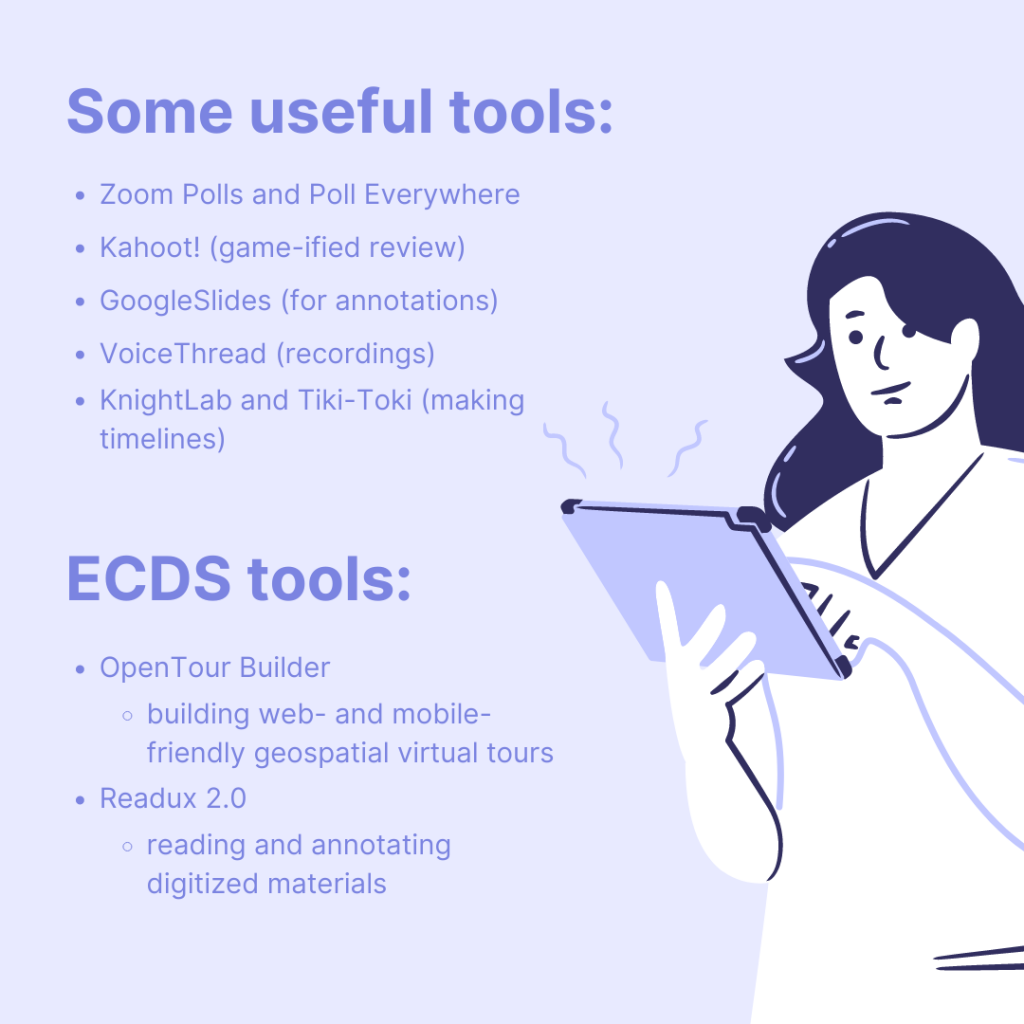
TOOLS:
- GoogleSlides
- Instructors can make a copy of slides for each breakout room, indicating each group’s number. This allows comments to be semi-anonymous but enables the instructor to call on a specific group based on notes relevant to discussion.
- Allows the instructor to see notes coming in on the slides without having to monitor/visit each breakout room.
- Zoom polls and Poll Everywhere (etc.)
- Students found polls fun and seemed excited to talk afterwards.
- Can be used at the start of class, or as a midway check-in point.
- Polls don’t necessarily have to relate to that day’s class material; instructors can use them as a check-in point or review opportunity.
- Kahoot!
- Game-ified check-in or review option.
Q: How can an instructor best optimize breakout room participation?
There is no need to monitor every breakout room, and in fact it may be beneficial to allow students to use this space on their own for discussion. There are, however, some ways to ensure better participation even without the instructor being present in breakout sessions.
TIPS:
- Instructors can assign students to specific groups.
- Emory College Online Teaching Strategies (ECOTS) advised instructors to do breakout rooms randomly the first time and then assign students to the same groups after that first time.
- Other instructors, however, found that random assignment was not as effective; they had to get to know the students’ personalities and attendance/participation amount, and then assign groups accordingly.
- After assessing students’ learning methods/personalities, instructors can rearrange breakout rooms to include a mixture of “go-getters” with those who are typically quieter.
- These groupings may still need to be rearranged throughout the semester to address variance between groups in terms of participation.
TOOLS:
- Zoom Annotation
- Allows instructors to share their slides so that students can write on them and respond. This is a great option for discussion questions, brainstorms, or even a whole-class analysis of a poem, photo, short passage, or primary document. The host of the Zoom can toggle between allowing anonymous or non-anonymous comments on the toolbar.
 Q: What are some tips on how to make a digital and/or mobile-friendly syllabus?

Some instructors noticed that if information on the syllabus fell “below the fold” or required scrolling to get to the information, students would often not end up seeing that content. Students may also be disinclined to read a long syllabus in general.
TIPS:
- If using a learning management system like Canvas, instructors can design a shorter syllabus and then put all the weekly tasks/assignments and descriptions in modules.
- Because the syllabus is attached to the calendar in Canvas, it might still be worthwhile to indicate all assignments with their relevant due dates in the syllabus.
- Make your syllabus navigation-friendly by using HTML headings and a Table of Contents with anchor links. Headings allow students to easily tab between sections. (If you create your document first in Word and then convert to PDF, the links, table of contents, and etc. will remain indexed/navigable.)
- Make a video overview or spend time in class going through the syllabus at the beginning of the semester.
- Show students where to access specific information and due dates, and make sure they understand the structure of your course syllabus, website, and/or Canvas site.
- Use the Announcements function in Canvas.
- Announcements get sent out to students’ email inboxes, so they will receive the information (like important due dates or necessary links for readings/course materials) even if they aren’t checking the Canvas site or modules page.
Other syllabus tips:
- If possible, keep a consistent schedule. For example, have readings due the same day each week, discussion posts due another day of the week, etc.
- Mention due dates and materials on multiple platforms (Canvas, email, in class); repetition is key.
Q: How do you determine the amount of content for asynchronous classes that is analogous to an in-person class?
Instructors found that some students ended up spending much more time on asynchronous material, which is unfair and often saps students’ time.
TIPS:
- Don’t assign what can’t be finished within a synchronous class period.
- For example, don’t assign a two-hour movie if your synchronous class is less than that amount of time.
- Keep things uniform and check in regularly with students.
- If you sense that the amount of work/time spent on asynchronous work is becoming unmanageable, ask the students and adjust accordingly.
- Specifically tell students that they only need to work for the amount of time a synchronous class would take. If they don’t finish the assigned work within that amount of time, submit what they have. (If a majority of students cannot complete the tasks within that amount of time, instructors may need to reassess what/how much they are assigning.)
- Let students know that it is okay if they do not complete every task in an asynchronous session.
- Specify expectations in your prompts and encourage students to stick to those conditions; i.e. only write 2-3 sentences, no more; or specify a time limit for each task.
- Otherwise students may feel that they have to go above and beyond, leading to them spending more time than is necessary on a task and end up burnt out.
- Tell students why they are doing the things that you have assigned in the asynchronous classes and encourage them to think about how they might prioritize completion of these tasks.
- Be upfront about expectations! Providing rationale for why you have assigned a certain task can help students better understand the coursework.
- Consider not grading individual asynchronous classwork, having that work instead count toward participation grades.
- Most instructors wouldn’t grade students’ notes or in-class group work during an in-person lecture; we can apply that method to asynchronous/online teaching too.
TOOLS:
- VoiceThread
- Allows instructors to record snippets of instructors tailored to students’ questions or needs.
- Can be used for students to summarize readings, give brief presentations or reflections on excerpted readings, and in place of discussion threads to allow more multimedia approaches.
- Language instructors can use VoiceThread for pronunciation/fluency practice.
- Could be used for analysis of more visual materials (photography, art, documents, etc.).
- Link to free VoiceThread workshops: https://voicethread.com/workshops
Q: How should an instructor handle or approach attendance and participation?
Some instructors noticed a marked increase in absences compared to a “normal” semester. Given the understandably difficult situations with which many students are contending, what are some tips for instructors about attendance and participation grades and policies?
TIPS:
- Consider not taking attendance during asynchronous sections. This is important for accessibility and for students in different time zones. We recommend a more lenient attendance policy overall; as long as students are learning the material or working on class material on their own, attendance policies should not be unnecessarily punitive during pandemic conditions.
- Instructors can record sessions and make these available afterwards for students that missed the asynchronous classes.
- Do keep an eye on student attendance though even if you’re not grading attendance; if absences accrue to a point that a student’s participation grade might suffer, try to intervene early on so that a student has time to address the issue.
- The point is not to punish students but to make sure they are keeping up with the material, giving time and space to figure out how to address why they might be struggling.
- Assign periodic participation activities.
- For example, have students create a certain number of slides relating to a course reading or topic that will count toward participation.
- Discussion leader roles can also encourage participation; instructors can assign or let students choose which day(s) they want at the beginning of the semester.
- Instructors can view and take attendance from Zoom reports.
- This information can be used toward participation grades, and can also let an instructor know if they should check in with any students that may be struggling/often absent.
- To encourage attendance in both synchronous and asynchronous sessions (or to encourage students to catch up on recordings they missed), instructors might consider making a few assignments that specifically draw on in-class content.
- For example, assigning a synthesis essay after finishing a module, in which students must report on something that happened in class (either from synchronous or asynchronous discussion, allowing students to choose based on interest/relevance).
- Another option is to ask discussion questions that build on something that occurred in class; these questions can be used during synchronous sessions or on an online discussion board/during asynchronous work.
Q: What are some tips for instructors who may be teaching more than one different class?
Even if an instructor has been teaching a particular course for many years, retooling it for remote teaching can take a lot of time. If managing more than one course, how can one optimize one’s efforts while still ensuring that students benefit from instructors’ insights?
TIPS:
- Consider using audio recordings or podcasts—even voice memo recordings—instead of video.
- This can break up the format and reduce Zoom fatigue for both student and instructor.
- Audio might allow instructors to deliver a longer lecture, as students can listen to audio while completing other tasks, and many podcast/audio players allow listeners to easily rewind in case they’ve missed important information.
- Audio can be used to transition between synchronous and asynchronous sessions, using recordings to tell students what they will work on during asynchronous classes and how those themes relate to what they have already discussed in synchronous classes.
- Instructors can pre-script lectures and read them out in audio format. Some may find this a more favorable option compared to video.
- This tip might not apply, however, to highly visual courses. Instructors might also want to consider whether it is feasible to include transcripts of podcast/audio recordings for accessibility purposes.
Q: How can instructors manage Zoom etiquette for large classes?
Bandwidth can become an issue with large class numbers, and those using Zoom might experience a lot of lag/unstable internet connection, especially when actively using video.
TIPS:
- One suggestion is to start class with the video/camera on so that instructors can greet students and lay out the day’s agenda, before turning cameras off.
- Encourage students to add a picture to their Zoom/video conferencing profile.
- Instructors can set aside time early in the semester for students to do so.
- If students do not have or feel uncomfortable using a headshot, consider specifying other options (like a students’ favorite book cover, or their pet, etc.)
Other important takeaways:
- Students need Zoom breaks, and instructors do too!
- Give students processing time to recap information.
- Instructors can build in reflection time by assigning less, or specifically blocking out time during class for thoughtful reflection and summarization.
- Do more by doing less.
- Recordings don’t have to be professional cinematic quality, and the technology you use to transmit information does not have to be fancy.
- Most of us are learning a new mode of teaching/engagement, and learning how to be a professional cinematographer or audio engineer need not be one of our tasks.
- The most important thing to consider is what you want students to learn, and the best/most accessible way of achieving that aim.
- Make sure students can access class content. Consider sending out an access form at the beginning of the semester where students can specify their access needs.
- For example, students in China do not have easy access to GoogleDocs. Some students might also want/need transcripts for videos and audio recordings.
- Our Emory Foundations for Online Teaching (EFOT) course uses a Technology Access Survey to assess student needs: https://forms.gle/X2ZzcTccD15AP13T6
- If you are unsure of an assignment or method, bounce ideas off of a colleague or trusted friend!
- Check out the Emory College Training & Consultations page for more information on additional questions or support.
Other useful tools:
- Knight Lab and Tiki-Toki
- Useful online software for making timelines.
- Readux 2.0
- Open source software (developed at ECDS) that allows one to read and annotate digitized materials.
- Feel free to email ecds [at] emory [dot] edu with any questions about Readux.
- OpenTour Builder
- Open source tour creation app (designed and created by ECDS) that allows one to make culturally- and historically-based geospatial tours that run easily on mobile devices.
- Any members of the Emory community can request an OpenTour site via this proposal form: https://forms.gle/HneeE4dWgwo31jbL7
- Outside parties can also partner with ECDS to use OpenTour, using a separate partnership proposal form: https://forms.gle/nKPq3qVQkbgq4kT9A
Header image (modified) source: Ananya Nair from Pixabay