Learning Objectives
- To learn about the process of fresco painting
- To gain direct exposure to the process of fresco
- To be able to identify the materials used in creating a fresco
- To understand how fresco differs from other types of paint media
- To engage in a group discussion about the process of fresco-making
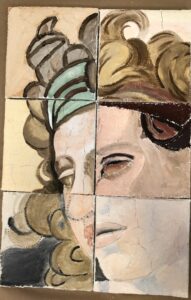
- To collaborate with your peers to create a multi-tiled fresco
- To understand why fresco is a more permanent/enduring form of painting.
- To recognize the safety precautions that are necessary to work in fresco.
Curricular Tie-Ins
This fresco workshop serves as a teaching mechanism for painting conservation, the instructor will discuss how this type of painting is both created and restored. This workshop will help students evaluate the following broader questions:
- How do materials and manufacture influence appearance, aging, preservation, etc.?
- How does time impact objects?
- What are the goals of cleaning and restoration? and Why is conservation sometimes controversial? (This can be answered with a discussion of the infamous cleaning of the Sistine Chapel)
Because each student is given a small part of a larger fresco design, students must engage in group discussions about large-scale fresco creation.
Steps
Before Class:
- Have students prepare fresco designs before class, or have a design that the instructor prepared ready for class
- Set down newspaper to protect the workspace
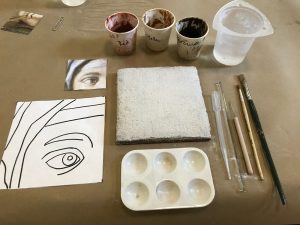
Directions:
1. Wet the ceramic tiles with water
2. Pour off liquid (lime milk) for later processes, and then transfer lime to a bucket
3. Add fine sand into the bucket (ratio of lime: sand = 1:1)
4. Use a wood stirrer to mix sand with lime
5. Apply the mixture onto a tile
6. Use a plastic scraper tool to spread out the mixture evenly
7. Let the tile dry for 15 minutes
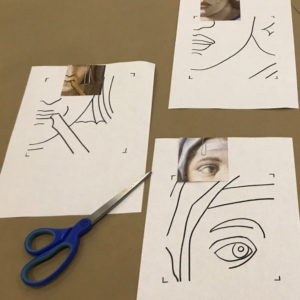
8. Cut the cartoon into approximately the same size as the tile
9. Transfer the outline of the cartoon onto the tile with a pokey tool
10. Add water to used pigments with a dropper
11. Transfer pigments to a paint palette with a glass rod
12. Add a little lime milk from step #2 to pigments with a dropper
13. Paint the tile with brushes
14. Let the tile dry
Tips
- Do not wear nice clothes. There are staining pigments used in this demo.
- Prepare fresco designs before class
- To save time, skip the first and second preparation layers of the fresco.
- Set aside lime milk for further use in the process.
- Allow intonaco to sit ~30 minutes after mixing. Should resemble the consistency of cookie dough. Once time passes, ration the mixture onto each fresco and instruct to spread evenly.
- best to have 1/8th inch thickness
- do not attempt to reuse previously opened lime for the intonaco mix
- do not spread with metal or organic materials
- Once the layer is even, allow setting for ~30 minutes or until the surface is firm to touch.
- Mix the ground paints with distilled water until they are a muddy texture. Spread a bit of each desired color onto a palette. Use the salvaged lime milk (2-3 drops per color on the palette) to lighten the pigment into useable paint.
- Mix darker than the intended final product. Shades will lighten with drying.
- While painting, mix the desired color on the palette, not the fresco. The fresco will disintegrate if too wet.
- Paint the background first, then add details.
- Keep the brush fairly dry while painting, but rinse in distilled water between each color use.
- Store the finished piece in a dry environment, otherwise, the paints will run.
- Clean all utensils with soap and water to prevent degradation by the lime to preserve them for future use.
Safety
- Do not use metal tools to contact lime because lime will corrode metal
- Always wear gloves because lime is highly alkaline, and it will dry hands
- Always wear aprons
Do not use toxic pigments such as Vermillion Red. Instead, we should use synthetic
Additional Materials
Introduction to fresco making
- https://www.jerrysartarama.com/free-art-instruction-videos/how-to-make-a-fresco-georges-lechevallier
A video about Michelangelo’s technique and the chemistry involved in making fresco paintings.
Guide on preparing colors